*This article first appeared in SVN Sports Broadcasting. Written by Tom White.
Imagine having a library where you can go into any book you want, change the story, characters or anything else you want.
That’s what you have with NewBlue FX Titler Live 4. We are gearing up for our first football game this Friday and have a great graphics package for the show.
Here’s a look at how our graphics were built and will be used in the game.

I started the build with the lower thirds. I was thinking about how the show would come together and decided to build each element accordingly. Our shows open with our play by play and color commentator welcoming the viewers and setting the scene. I need a lower third to give them a name to the audience. After digging through the library, I didn’t find a two-person lower third so I made one. I needed a single lower for our sideline talent so I found one that I wanted to use. It’s pretty simple, our logo with the name of the field reporter. The subtitle will probably be “Live on the Sideline.” So that was pretty easy. Now’s where the magic of the templates come in. I duplicated the template in the timeline. Took it into the editor. Extended the length of the graphic. Added the name and subtitle, right justified. Lined it up and I was good to go. Creating the lower thirds took about 5 minutes once I found the template I liked.

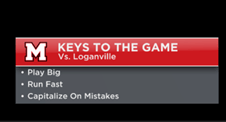
During the opening segment, we will have the keys to the game for each team. I used the CB list template from the library and made some very small changes. I created the graphic for our team by changing the logo in the template to our logo. I also made some cosmetic changes like getting rid of the box that outlined the logo. I wanted a more simple look. Other than that, I just filled in the info provided within the template. We will obviously talk about the other team’s keys as well. I simply duplicated the graphic in the timeline and made changes as needed. All told, these two graphics took about 5 minutes to build.

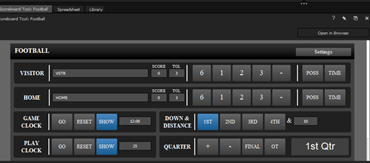
Next was the most fun to build. The scoreboard. Just as before “They’ve Got A Template For that”.

All of your major sports are there, Football, baseball/softball, hockey, tennis, volleyball. Our scoreboard needed a little work. The template comes with a play clock. In Georgia, football doesn’t have a play clock so I went into the editor and simply deleted the play clock. Now I don’t have to worry about it. Other than that, I changed the logos to our logo and the opposing team and we were good to go.

Now that we have what I think is the basics to produce a great show, I built some other graphics that really kind of show off but are super easy to build.
Now to really show off, I pulled our roster into a spreadsheet and built a lower third with the basic player info – name, number, height, weight, class, etc. – all of the stuff you expect to see on a roster for a player. Now when we spotlight a player, we can throw their info on the screen. This is something that when baseball season gets here, I am going to probably overuse because I can pull their stats and other info with game changer and create some really awesome graphics!

So in our build, there are graphics that are manually controlled (lower 3rds for talent) controlled via a scoreboard controller, and fed via spreadsheet(the roster and lower ticker).
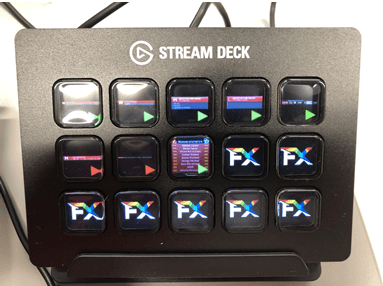
As a teacher, I am in one of two situations. I either have students running out of my ears looking for places to put hem during a live show or I am three students short of the plan. Using Titler Live 4 helps me in both cases. I can expand the software as I need including having a student who is in charge of stats manipulate the spreadsheet for the game. Using One Drive, One student can work on one machine and save their work and the content will be saved to the machine with Titler Live on it. I can also collapse the plan to use just one student and pair them with an El Gato Stream Deck and they can run everything single-handed.
The stream deck actually has Titler Live profiles built-in and when connected and Titler Live is open, you can see and fire graphics from the stream deck.

As you can see in the photo, you have a visual representation of the graphic on the stream deck so you don’t have to go back and forth in the titler live application if you are slammed or if you just want to keep it simple and remove the playlist from the main view of Titler Live 4. You can see what graphics are live by the color of the arrows on the stream deck so you can really do graphics one-handed!
I am really excited for Friday’s game to see how our graphics look in real-time. So far, I have only done them over old footage but using Titler Live 4, I know we are going to have the best, easiest to use graphics system in the league!

Captivate Broadcast
Streamline your workflows and deliver unlimited layers of 4K graphics for sports, social streaming, or any professional broadcast.