Free tools for your church broadcast are out there! Read this to bring your house of worship service online in 3 easy steps!
These are confusing times for all of us. For the first time in history, a society is being asked to move all of its interactions onto digital platforms for the good of ourselves and our fellow citizens. The outbreak of COVID-19 has pushed many of us to learn new skills, new software, and most importantly, new ways to find peace in this time of uncertainty.
For those in charge of spreading hope and positivity, it is more important than ever to maximize the reach and power of our message. Luckily, there exists numerous options for quickly broadcasting to those in need.
Of course there is online church presentation software out there designed to maximize your message, but we will talk about that near the end of this article. If all you need is to get up and running fast, you’ve come to the right place!
The purpose of this tutorial is to show you how to get your service up and running quickly and easily, requiring little technical knowledge.
Streaming your Church Service to Facebook Live from Mobile
This is probably the easiest option out there. The only things you need are a smartphone and a Facebook account, which most people already have. These steps will show you how to produce a basic broadcast in minutes.
First step: Open the Facebook app on your phone 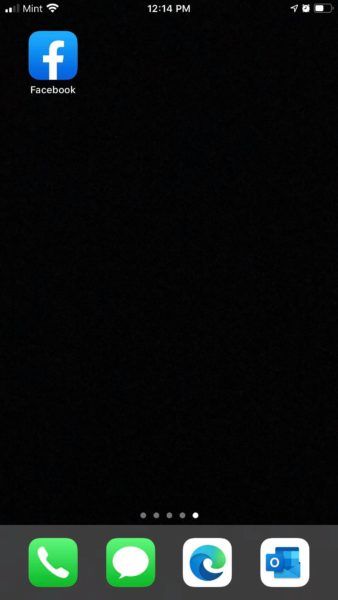
Second step: Near the top of your home screen is a button that says “Live”. Tap it. 
Third step: This will open your camera, and display a button that says “Start Live Video”. Pressing this button will immediately begin your broadcast, and anyone logged onto Facebook can find it by scrolling through their feed or visiting your Facebook page directly.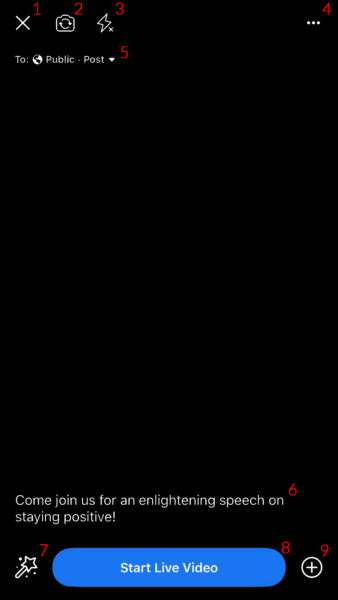
The other options on this screen are:
- X – Closes the screen and returns you to Facebook.
- Camera – Switches to Rear camera mode (More on this below).
- Lightning – This will emit light from your phone, either by activating the flashlight or brightening the screen, depending on which way the camera is facing.
- Ellipsis (Dots) – Contains the “Add Donations” button to select nonprofits and “Turn off notifications” which will prevent your phone from ringing until the broadcast is over.
- To (Audience) – This is the most important field on this screen, as it determines who will have access to your broadcast. It will default to “Public”, which means that anyone can see it from your page, and your friends will get notified that the stream has begun. This will work for most cases, however, you can select different options such as “Only friends”, “Specific people”, and “Groups”. If your church already has a Facebook group, you will likely want to choose that group here.
- Description – This field will let you type a description of your broadcast. For example, you could write “Sermon on Staying Positive”. Your viewers will see this message alongside the video in their Facebook feed.
- Wand – This button will give you a variety of “fun screen effects”. These are fun toys, but I wouldn’t recommend adding them to your stream unless you believe they have a place.
- Start Live Video – This will begin your broadcast.
- Plus (or Down Arrow) – This will give you more toys and filters. Again, I suggest experimenting with these offline before adding them to your stream.
Once your broadcast has begun, you will see many of the same buttons as above, only they have been moved to the bottom of the screen. There is also a comment button, where you can leave a comment on the broadcast in the same areas as your viewers, and a “finish” button which ends the stream. After your video has finished, you will be prompted with the option to delete it, or post it to your page/group. Furthermore, the button at the top right allows you to download the video of your broadcast straight to your device.
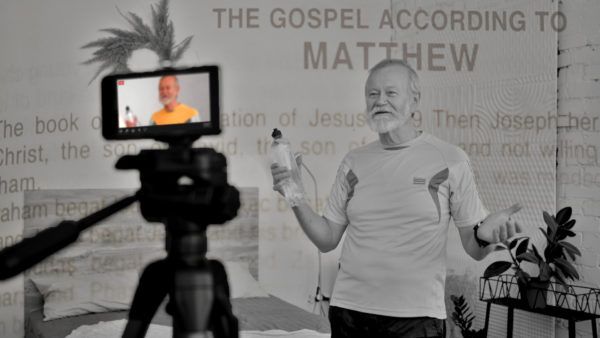
You can achieve a surprisingly high quality broadcast using the camera that is already in your pocket. You can use lamps in lieu of professional lights and a desk in lieu of a tripod for your camera. Get creative!
Some other things to remember, Facebook can be unpredictable with how it advertises your broadcast, so be sure to tell your viewers where to find your stream ahead of time (In most cases, either your personal page or the group page). And remember, once your stream starts, hold your phone sideways. Holding your phone upright is fine for person-to-person communication, but if anyone will be watching on a computer, they don’t want to watch you as a tiny vertical sliver surrounded by black bars. Furthermore, the camera on the back of your phone is probably better than the one on the front, so if possible, mount your phone on a tripod, stack of books, or just have someone else hold it.
Streaming your Church Service to Facebook Live from Desktop and Laptop Computer (Win/Mac)
To start streaming to Facebook from your computer, visit https://www.facebook.com/live/create and click Create Live Stream
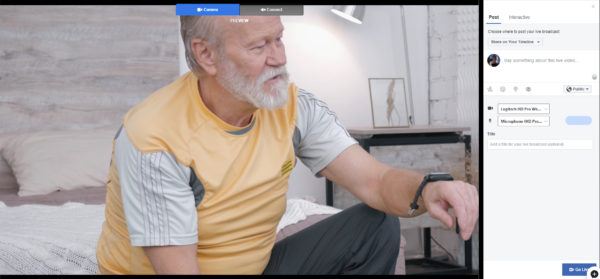
If you are simply looking to use your computer because it has a webcam attached, this process is very similar to using Facebook Live for mobile. Simply click “Camera” above the preview, select your options on the right (Where it will be posted, a description, who will see it, etc…), and then verify that the correct Webcam and Microphone are selected from their respective dropdowns. Choose an optional title for your broadcast and press “Go Live”.
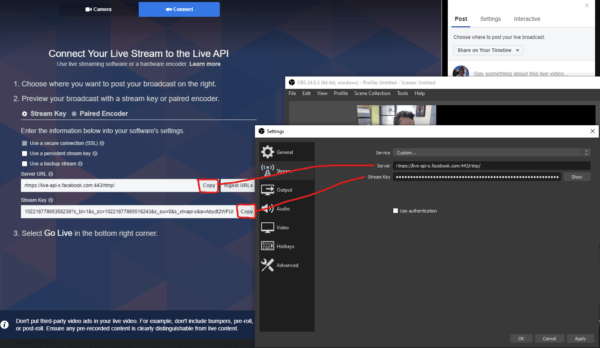
Utilizing the webcam on your computer will serve as a quick solution to start streaming, however, Facebook Live comes with the option to receive input from streaming software such as vMix and OBS. Click the Connect button at the top of the video preview to see the necessary Server URL and Stream Key to enter into your software.
If this sounds like an alien language to you, that’s okay. This stuff is meant for more experienced broadcasters. We’ll talk more about it in the sections below.
Streaming your Church service to YouTube
The process of streaming your service to YouTube is very similar to that of Facebook. Start by going to YouTube.com or open the YouTube app on your phone. Click the camera with plus icon at the top right of the screen, and select Go Live. On desktop, YouTube will default to using your webcam, but is an option to select “stream” at the top to broadcast using outside software (And Manage to modify options for that type of stream). We will talk more about this in the next section.
Click the icon outlined in red
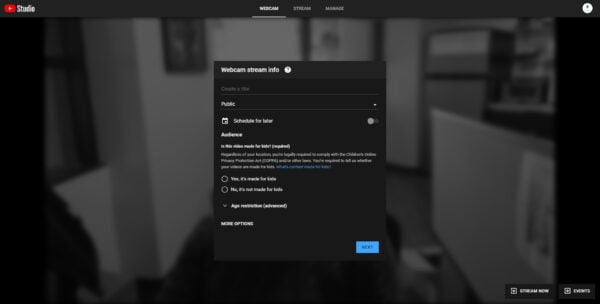
The following screen will look something like this. Here, you can enter a title, choose who will view your stream, schedule it to begin in the future, and select age restrictions. Furthermore, you can click “More Options” to add metadata, select your devices, and control Advanced Settings, such as allowing chat, toggling sponsorship options, and enabling monetization via ads (A note from a professional YouTuber- The revenue you earn from placing advertisement on small local broadcasts will be in the single digit of pennies. Disabling monetization and encouraging donations is 9 times out of 10 the way to go). In most cases, you can leave all of these options on their default values and just click “Next”. Make sure you’re looking good, because this will give you about 3 seconds before YouTube snaps a picture of you for the stream’s thumbnail. But don’t worry, you can click the thumbnail on the next screen to change it to any image you want!
Ensure your settings look correct and press Go Live. While your stream is live, the only real options you have are to mute your mic, share your stream, or end your stream. A popup will appear giving you some brief statistics for the stream and giving you the option to edit an archived version of the stream in YouTube studio.
TIP: If you have never spoken in front of a camera, you would likely benefit from reading a quick article on “Vlogging” (i.e. Video Blogging) to get a feel for what there is to know about broadcasting to an audience, be it live or pre-recorded.
Streaming your Church service using Streaming Software (OBS, Wirecast, vMix)
You may have noticed that both Facebook and YouTube have similar options for streaming with your webcam as well as through the use of streaming software. Using software is a much more versatile option, as it allows you to add elements such as multiple cameras, graphics, music, and more. It is unlikely that an inexperienced user will be able to just “pick these up and go”. Still, churches with more modern A/V systems and experienced staff are likely more familiar with these options, which can be used to imbue your broadcasts with the same production value as your members have come to expect from high quality in-house services.
In fact, if you are reading this article and would like to share it with your media person, feel free to share this page with them by copying and pasting the following link:
https://newbluefx.com/blog/how-to-stream-your-church-service-to-facebook-and-youtube
The first piece of software I recommend for streaming your service is Open Broadcast Software (OBS). OBS is lightweight, intuitive, and most importantly, FREE. You can download OBS here:
The act of setting up your broadcast is highly variable and unique to every stream, so there’s no need to go into detail on any one process (There are hundreds of in-depth tutorials for specific tasks online). Still, the basics are:
- Enter the stream URLs/Keys visible from YouTube and Facebook’s Connect to Stream options by navigating to File > Settings > Stream. Once entered, press Apply and OK.
- Create a new scene to act as a “folder” for your sources.
- Create new “sources” to feed visuals into your stream, such as cameras and graphics.
- Some software, such as Titler Live, can be used to instantly create professional quality animated graphics. Integration with spreadsheet documents make lyric and bible verse displays a snap, and the built in audio lets you add sound effects with ease.
- Click the gear icon in the audio mixer under Mic/Aux to select your microphone (if necessary).
- Press “Start Streaming”

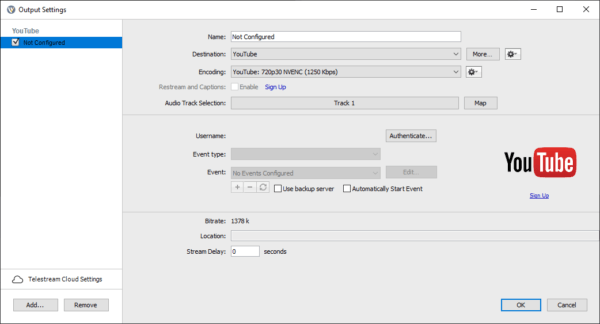
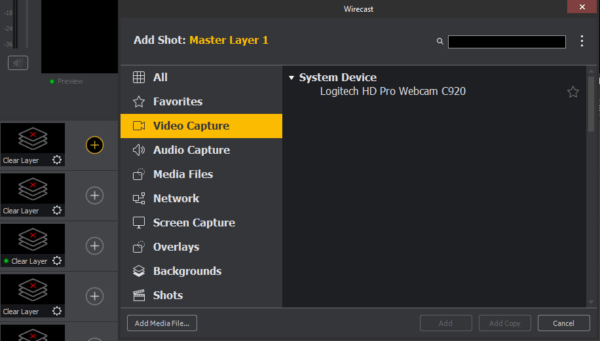
The other piece of software I recommend is Wirecast. Unlike OBS, it is not free. However, it is the more professional solution, with considerably more options for advanced broadcasts. If you have Wirecast, set up your stream by going to Output > Output Settings. Select an option from the dropdown (Facebook Live, YouTube, Stretch and more). Some outputs will allow you to sign into your associated account and will handle the output automatically. Other times, you may need to enter your stream URL/key manually. Once that is done, click the + button in the layer list to add shots. A shot is any visual element of your broadcast, such as camera feeds, graphics, etc…)
If your church already uses presentation software, setting up your shots and graphics will be reasonably familiar. Software such as ProPresenter, MediaShout, EasyWorship and Faithlife Proclaim bundle features such as graphics, lyrics, and mixing into a single interface for local recording. When it comes to online streaming, your broadcast software will handle the video outputs, but graphics and presentation assets are handled by plugins such as Titler Live.
Titler Live adds quality and professionalism to your broadcast by feeding graphics, animation, and data into the streaming software itself. It is not free, but it pays for itself in dividends in time saved and quality provided. Too often, on-screen graphics are relinquished to being still images because of the knowledge and labor required to repeatedly produce video-based visuals. Still, animations are more engaging than slides because people want to see energy and life. They want movement and animation, sound, and more.
Animated titles add a new dimension of energy and engagement to your broadcast
Titler Live is a piece of software that works in conjunction with your streaming software and is a perfect fit for online church presentations because it allows you to display high quality, customizable, animated graphics instantly, DURING your stream, with no expertise required. Just change the text field, and a new graphic will be created automatically.
Furthermore, Titler Live is compatible with spreadsheet files (such as excel), so that song lyrics and bible verses can be provided to the broadcaster in advance, who can select and display them from inside its interface in a single click.
Single-click lyric/verse transitions, the end result of spreadsheet integration
You can even use it to display real time comments from Facebook and YouTube viewers in an elegant format, live, and fully animated.
Social Pro automatically grabs comments from Facebook so you can play them in your broadcast
Titler Live is an incredibly versatile piece of software that lets you apply any text, from any source, to any graphic, complete with animations (and sound effects!). Its versatility makes the possibilities endless, and its low learning curve and ease of use make it an attractive option to every level of broadcast. It is a must-have for any house of worship’s streaming services. You can even try it out for free by visiting https://newbluefx.com/products/on-air-graphics/titler-live-broadcast/ and clicking FREE TRIAL on the green bar at the top.
Alternately, you could use PNG images in lieue of animated titles. In most cases, these are added through your broadcast software by adding a new source and selecting “Image Source” or “Media Source” depending on which software you are using. Keep in mind, using this method requires the graphics to be produced in advance, and they will be lacking any animations (although most streaming software is capable of fading them in/out). Ensure that your graphic is located at the bottom left of a mostly empty canvas to leave room for your subject, and that the background is an empty alpha layer.

If you are using Photoshop, your graphic would look something like this. If you don’t have Photoshop, graphics can be created in many other free programs.
These days, it’s almost as easy to start a broadcast as it is to make a phone call. And for every expensive piece of broadcasting hardware out there, you probably already own a cheap alternative. It takes little more than a few lights and the proper camera placement to make a shot come alive. But if you are more interested in a professional level setup, you will need:
- Dedicated camera(s)
- Tripod(s)
- Lights
- Microphone
- Streaming Software
- Graphics Software
- A dedicated streaming computer
- A person to operate the stream
This article is just a short introduction to streaming. Though technology has come a long way in making it easy to create a broadcast, there exists an endless amount of information on how to make the best broadcast you possibly can. I hope that the steps I have provided in this article serve to get your service up and running quickly, as well as lay the groundwork for improving your broadcast as the process becomes easier and more familiar. As the world becomes increasingly digital, it is inevitable that online sermons and other services will become the norm. And with the information provided in here, it is my hope that your church will step confidently and gracefully into this new era of worship. If you are interested in publishing your broadcasts as a video, you may also be interested in NewBlue’s suite of video editing tools.
Sean Willmon
Product Specialist
NewBlue Inc.

Titler Live 4 Complete
Combine the features of Present, Social, and Sport to bring your live productions to the next level and add a second layer of graphics.